Hmm, I think I can hear the collective groans! Anything but a square isn't my favourite either but it's good to try a challenge that drags you kicking and screaming out of your comfort zone. Honest. (So long as I can embellish I'll give it a whirl!!) Here is my effort, another Finnish Star. As promised there is a tutorial to go with it (possibly the world's longest tut - death by photo - and in some cases blurred photo :) )

The paper was one in my stash box and I have no idea where it came from - I have too much paper!!! The lovely swirl is a die-namics die and the snowflakes are spellbinders. Here's a quick close-up (apologies for the colouring - it was, for me, done in super quick time)

* * Honestly, I'm losing my marbles! The reason I made it red and green was so that I could enter the Winter Wonderland challenge and then I nearly forgot to link it up! Barmy woman! So I'm now linking it to Winter Wonderland : Challenge red and green
I'm also entering it into: Simon Says Stamp: Challenge Anything Goes
J&C Creations Challenge - Something a Little Bit Different
Okay, if you're interested in the tut get a LARGE cuppa and a comfy chair and possibly a couple of nurofen. If you get to the end you deserve a gold star and a gin and tonic!!
You will need:
1 piece 12"x12" heavy weight double sided paper or card
ruler
guillotine/trimmer
tacky glue - such as cosmic shimmer glue or art institute glitter glue
pencil
scissors
small pegs (optional)
scoring board (optional)
Cut the the paper into 12 one inch strips.

Measure and mark the 5 1/2 inch and 6 1/2 inch point along the sides of two strips of paper.


We're not half way yet - how ya doing? Another cuppa might be an idea!
This next bit is tricky to explain, but fear not, I have more badly taken photos to help!!
We're going to join strips that are at right angles to each other and glue them together.
 Twist the vertical strip of paper so that the underside is facing you.
Twist the horizontal strip in the same way and glue the overlapped area together.

You can either stand and hold the join until it dries (!) or hold it with cute mini pegs!

Repeat this process on all four quarters:

Here's the good bit - you have to repeat this whole process with the remaining six strips of paper! Noooo, don't give up - it really doesn't take that long. This tut is a bit OTT but I'd rather give you too much info than too little and it's giving me the chance to show off my photography skills ;)
Righty ho, now you should have two constructions (!) that look like the one above. Now we've got to join 'em together.
Lay one 'star' on its back (there's a joke in there somewhere!)

Lay the second 'star' on top of it the right side up.

Thread the remaining unattached strips through the star 'points' which they are currently lying over:


Glue in place:

Cut all the excess paper from the star points.


Ta-dah!!!!!! It's done - go have a lie down in a darkened room!


The paper was one in my stash box and I have no idea where it came from - I have too much paper!!! The lovely swirl is a die-namics die and the snowflakes are spellbinders. Here's a quick close-up (apologies for the colouring - it was, for me, done in super quick time)

* * Honestly, I'm losing my marbles! The reason I made it red and green was so that I could enter the Winter Wonderland challenge and then I nearly forgot to link it up! Barmy woman! So I'm now linking it to Winter Wonderland : Challenge red and green
J&C Creations Challenge - Something a Little Bit Different
Okay, if you're interested in the tut get a LARGE cuppa and a comfy chair and possibly a couple of nurofen. If you get to the end you deserve a gold star and a gin and tonic!!
You will need:
1 piece 12"x12" heavy weight double sided paper or card
ruler
guillotine/trimmer
tacky glue - such as cosmic shimmer glue or art institute glitter glue
pencil
scissors
small pegs (optional)
scoring board (optional)
Cut the the paper into 12 one inch strips.

Measure and mark the 5 1/2 inch and 6 1/2 inch point along the sides of two strips of paper.

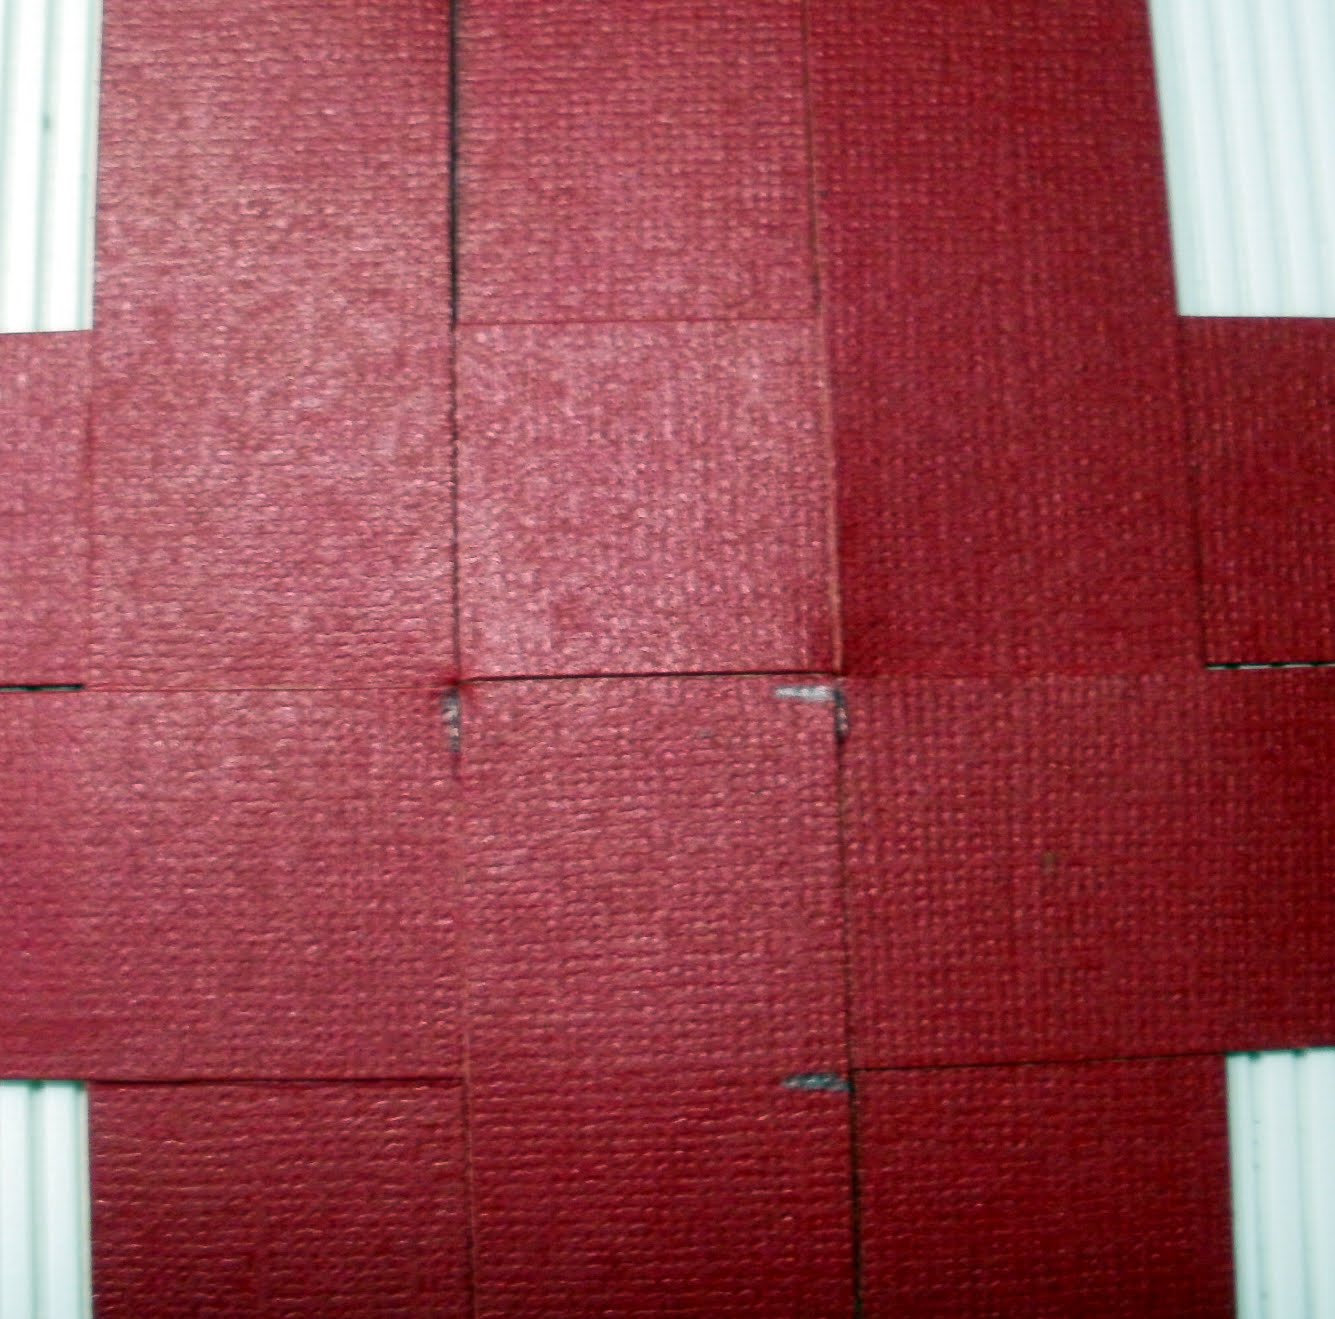
For the assembling I work on top of a Martha Stewart scoring board as this helps me line the strips up vaguely straight!! Lay one strip of paper horizontally and glue the centre of the other strip vertically OVER the top of the horizontal strip (glue in place).


To the left of the first vertical strip, lay another piece of paper vertically - this time you need to lift up the horizontal strip so that the vertical strip is UNDER the horizontal strip (glue in place). It's just paper threading and once you've done it once it's easy peasy!

Lay the fourth strip of paper to the right of the initial vertical strip. Again this needs to be UNDER the horizontal strip (glue it in place)

Okay, strip 5 needs to go above the first horizontal and threads through the three vertical strips. Work from left to right as you look at the strips. This strip needs to go UNDER the first strip (and glue) OVER the middle strip (and glue) and under the third strip on the right (and glue).

The sixth strip needs to go beneath the first horizontal and thread as you've just done - UNDER the first strip, OVER the middle and UNDER the last - glue under all the joins.

This next bit is tricky to explain, but fear not, I have more badly taken photos to help!!
We're going to join strips that are at right angles to each other and glue them together.

Twist the horizontal strip in the same way and glue the overlapped area together.

You can either stand and hold the join until it dries (!) or hold it with cute mini pegs!

Repeat this process on all four quarters:

Here's the good bit - you have to repeat this whole process with the remaining six strips of paper! Noooo, don't give up - it really doesn't take that long. This tut is a bit OTT but I'd rather give you too much info than too little and it's giving me the chance to show off my photography skills ;)
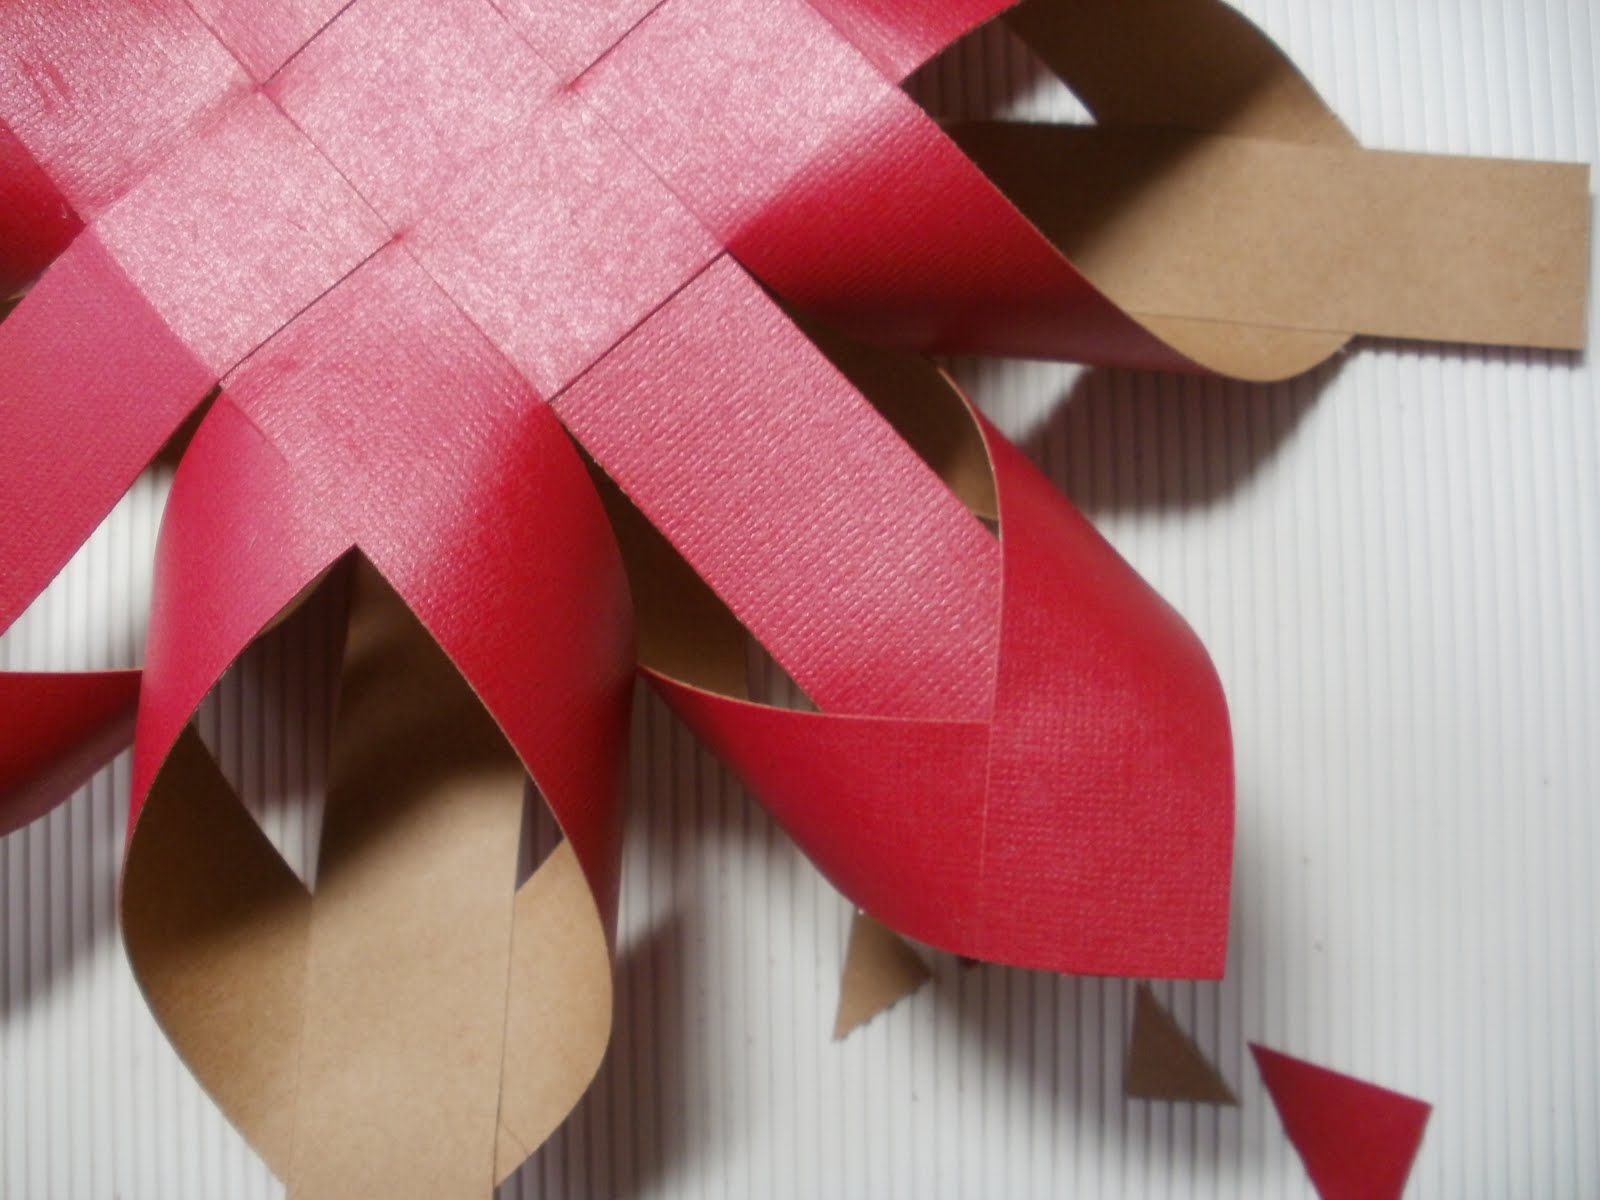
Righty ho, now you should have two constructions (!) that look like the one above. Now we've got to join 'em together.
Lay one 'star' on its back (there's a joke in there somewhere!)

Lay the second 'star' on top of it the right side up.

Thread the remaining unattached strips through the star 'points' which they are currently lying over:


Glue in place:

Cut all the excess paper from the star points.

Ta-dah!!!!!! It's done - go have a lie down in a darkened room!

The star, I think, looks best on patterned double sided paper. The one I made for the Debbi Moore POTW (Bobbin the Bear Christmas CD) had to be made with plain lilac paper so I embellished it with lots of tiny snowflakes and it doesn't look too bad!

As I've mentioned in previous 'Finnish Star' posts, the original tutorial for the star can be found on the Wiccababe's blog. If you give one a whirl I'd be really cheered if you sent me a link to it!
Blimey, I'm exhausted now! I'm off for a sit down, a cup of tea and an episode of CSI NY! Hope you get a chance to join in the challenge this week - you don't have to make a star!!!!!!!!
Big hugs, Jayne xxx
27 comments:
Oh Jayne, this is brilliant! I am saving this Tutorial for later when I can come back with cuppa in hand! Love Love Love it! I smiled and nodded at your opening paragraph, you sum it up so well. Thanks for stopping by my Blog with such a lovely much appreciated comment. Judy x
WOW WOW WOW... jayne, i love this and cant wait to have a go at it.. Thanks for the brilliant tutorial.. Will let you know how I get on lol...
Hugs kelly
OMG woman, that was a shock first thing this morning - crumbs, I don't think I shall tackle the star any time soon but will put my crafty brain into gear while I'm at work and see what else I can think up for the challenge. Wow, this is a stunning result - you have far more patience that you own up to! Right, where's my gold star and the gin? Hugs Sxx
WOW! This wonderful. thanks so much for sharing a fab tutorial. My daughter (looking over my shoulder) loves this and is keen to have a go.
Hugs Sue
Gorgeous creation, Jayne! I do love it,great job with image as well, thank you for joining Winter Wonderland this week, hugs, Miria
oh wow these are fantastic jayne.really love the intricate star and your images and colouriing are stunning :D
thans for the fabulous tutorial too :D
xx coops xx
Wow, this is fabulous and what a detaild tut too. Thanks for playing at WW.
What a brilliant tutorial and such a beautiful creation. Thank you for joining us this week at Winter Wonderland love Linda
Beautiful shades of red and green and a lovely creation, thank you so much for joining us this week at the Winter Wonderland
Hugs Kate xx
ps great tut
Fantastic Tut,am definitely gonna have a go at this tomorrow. Hopefully it will come out ok,will let you know,,love sue09 JS forum
Fantastic tut,cant wait to try it out. Love the decorations on yours,they are gorgeous,,love sue09 JSforum
What a stunning star! I love it and your tutorial is brilliant. You must be so patient to take all those photo's. You've done it all so clearly - brilliant and I didn't need any nurofen!!
Lorraine x
Thanks so much for that tutorial! I love your star and the image is wonderfully colored, what are you talking about?! The papers are perfect with it too.
Hi Jayne, thanks so much for your very helpful tutorial which I saw yesterday. I couldn't resist having a go, so heres my blog address http://hautecouturecrafts.blogspot.co.uk/2012/08/finnish-star.html I'd love it if you could stop by and let me know what you think. Thanks again
Jane x
Good Evening Jayne,
Just came over from Jane`s Blog where she has made your Star.
What a "Star" you are to share your wonderful creation, I love, love, love it.
I am going off on holiday but have written in my diary to have a go at this. when I get back.
I feel if I can make some really well, pop each one in a hand made box what a super wee gift for Christmas. Actually this could be used for any occasion. Beautiful as a very different Wedding Card, Baby Birth Card Oh! my head is buzzing with ideas.
Thank you
Patricia
patricia-summerhousecrafts.blogspot.com
wow wow wow Jayne this is stunning I love it. Carol xx
well i copied the instructions looked and though nah i'll never do that but wow it was easy to follow(great pic's) thanks
fantastic and thank you for sharing xxxxxxxxxxxxx
looks stunning Jayne and a great tutorial! might even have a go now!
Kim x
Wow hunnie sorry it took so long for me to comment been a bit off colour, this is fantastic now I wanna make one and your tut is brilliant your such a clever clever lovely lass, big huggies June xxxxxxxxxxxxxxx
Get outta town this is so freakin' FABULOUS! Wowwwee Jayne!!! Okay, I don't know if I'd be able to pull something like this togehter .. mines would probably fall apart halfway done. lol!!! I totalllllly LOVE this!!! Gorgeous Gorgeous Gorgeous!
Big Hugs,
Elise
Hi Jayne, I spotted this project on the Lili's Little Fairies Challenge Blog and just had to pop in and say how fantastic it is. I am definitely going to be having a go, thanks for the inspiration.
Natx
Fabulous project! Thanks for playing along with us at the Simon Says Stamp Challenge Blog!
Stunning creations! So creatively executed and totally adorable!
Hugs, Iulia
Great tutorial, easy to follow, thanks so much.
I'll definately be seeing stars after a few goes at this!
I love this project, the paper is perfect for it. Thanks for the fabulous tutorial, easy to follow with just the right amount of photos :-) Donna
Fantastic! Thanks for the tutorial, I will make one for sure and let you know.
Post a Comment